
Introduction
In the previous blog, I showed you how to build a CI pipeline using Databricks CLI eXtensions and GitLab. In this post, I will show you how to achieve the same objective with the latest and recommended Databricks deployment framework, Databricks Asset Bundles. DAB is actively supported and developed by the Databricks team as a new tool for streamlining the development of complex data, analytics, and ML projects for the Databricks platform.
I will skip the general introduction of DAB and its features and refer you to the Databricks documentation. Here, I will focus on how to migrate our dbx project from the previous blog to DAB. Along the way, I will explain some concepts and features that can help you grasp each step better.
Development pattern using Databricks GUI
In the previous post, we used the Databricks GUI to develop and test our code and workflows. For this blog post, we want to be able to use our local environment to develop our code as well. The workflow will be as follows:
-
Create a remote repository and clone it to our local environment and Databricks workspace. We use GitLab here.
-
Develop the program logic and test it inside the Databricks GUI or on our local IDE. This includes Python scripts to build a Python Wheel package, scripts to test data quality using pytest, and a notebook to run the pytest.
-
Push the code to GitLab. The
git pushwill trigger a GitLab Runner to build, deploy, and launch resources on Databricks using Databricks Asset Bundles.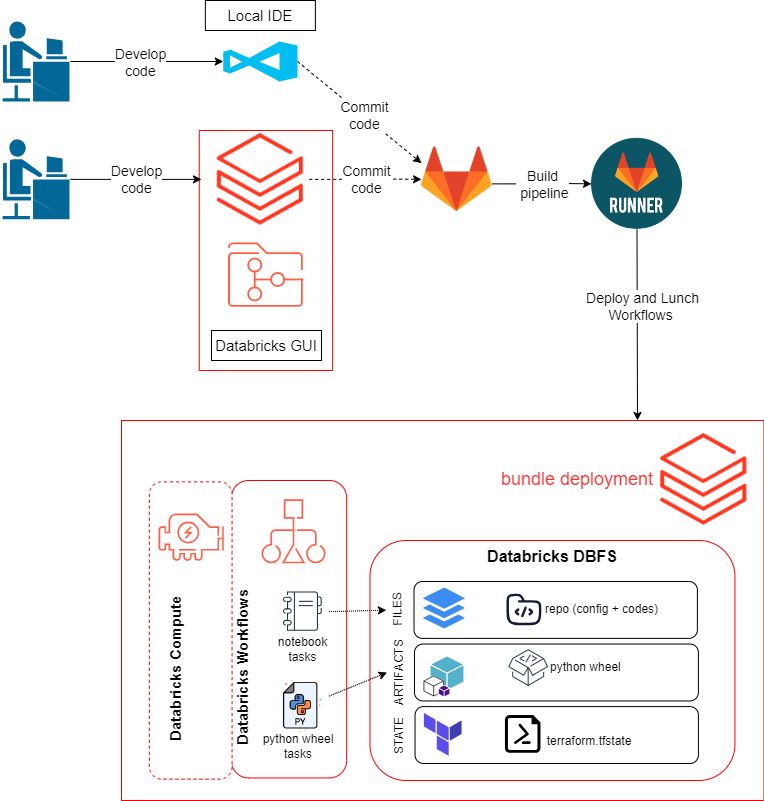
Setting up your development environments
Databricks CLI
First of all, we need to install Databricks CLI version 0.205 or above on your local machine. To check your installed version of the Databricks CLI, run the command
databricks -v. To install Databricks CLI version 0.205 or above, see Install or update the Databricks CLI.Authentication
Databricks supports various authentication methods between the Databricks CLI on our development machine and your Databricks workspace. For this tutorial, we use Databricks personal access token authentication. It consists of two steps:
- Create a personal access token on our Databricks workspace.
- Create a Databricks configuration profile on our local machine.
-
To generate a Databricks token in your Databricks workspace, go to User Settings → Developer → Access tokens → Manage → Generate new token.
-
To create a configuration profile, create the file
~/.databrickscfgin your root folder with the following content:
[asset-bundle-tutorial]
host  = https://xxxxxxxxxxx.cloud.databricks.com
token = xxxxxxx
Here, the asset-bundle-tutorial is our profile name, the host is the address of our workspace, and the token is the personal access token that we just created.
You can create this file using the Databricks CLI by running databricks configure --profile asset-bundle-tutorial in your terminal. The command will prompt you for the Databricks Host and Personal Access Token. If you don’t specify the --profile flag, the profile name will be set to DEFAULT.
Git integration (Databricks)
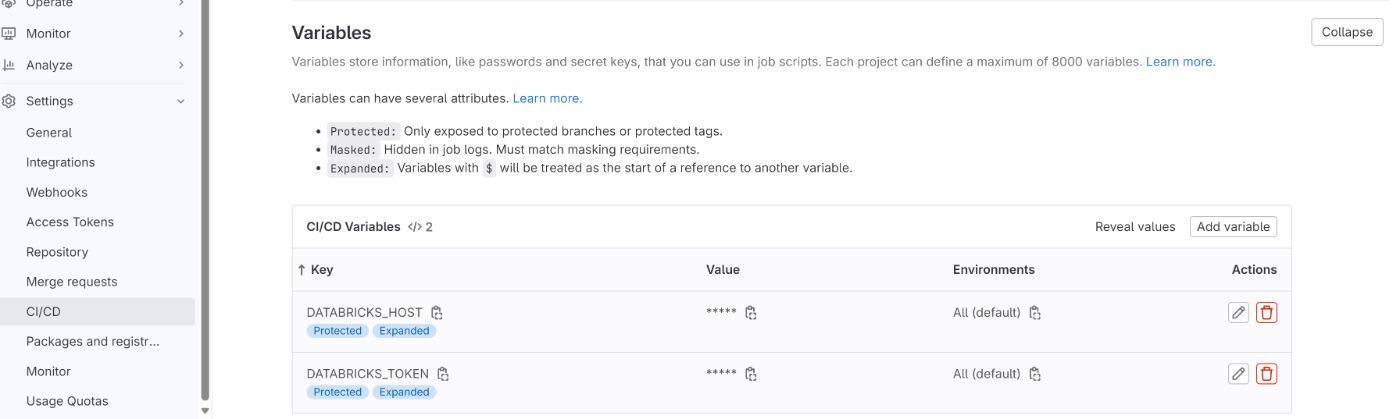
As the first step, we configure Git credentials & connect a remote repo to Databricks . Next, we create a remote repository and clone it to our Databricks repo , as well as on our local machine. Finally we need set up authentication between the Databricks CLI on the Gitlab runner and our Databricks workspace. To do that, we should add two environment variables, DATABRICKS_HOST and DATABRICKS_TOKEN to our Gitlab CI/CD pipeline configurations. For that open your repo in Gitlab, go to Settings→ CI/CD → Variables → Add variables
Both dbx and DAB are built around the Databricks REST APIs, so at their core, they are very similar. I will go through the steps to create a bundle manually from our existing dbx project.
The first thing that we need to set up for our DAB project is the deployment configuration. In dbx, we use two files to define and set up our environments and workflows (jobs and pipelines). To set up the environment, we used .dbx/project.json, and to define the workflows, we used deployment.yml.
In DAB, everything goes into databricks.yml, which is located in the root folder of your project. Here's how it looks:
bundle:
name: DAB_tutorial #our bundle name
# These are for any custom variables for use throughout the bundle.
variables:
my_cluster_id:
description: The ID of an existing cluster.
default: xxxx-xxxxx-xxxxxxxx
#The remote workspace URL and workspace authentication credentials are read from the caller’s local configuration profile named <asset-bundle-tutorial>
workspace:
profile: asset-bundle-tutorial
# These are the default job and pipeline settings if not otherwise overridden in
# the following "targets" top-level mapping.
resources:
jobs:
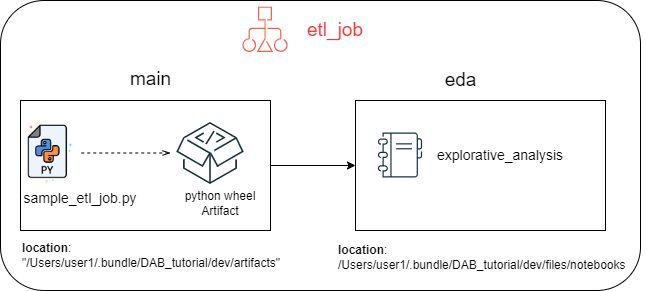
etl_job:
tasks:
- task_key: "main"
existing_cluster_id: ${var.my_cluster_id}
python_wheel_task:
package_name: "my_package"
entry_point: "etl_job" # take a look at the setup.py entry_points section for details on how to define an entrypoint
libraries:
- whl: ../dist/*.whl
- task_key: "eda"
existing_cluster_id: ${var.my_cluster_id}
notebook_task:
notebook_path: ../notebooks/explorative_analysis.py
source: WORKSPACE
depends_on:
- task_key: "main"
test_job:
tasks:
- task_key: "main_notebook"
existing_cluster_id: ${var.my_cluster_id}
notebook_task:
notebook_path: ../notebooks/run_unit_test.py
source: WORKSPACE
libraries:
- pypi:
package: pytest
# These are the targets to use for deployments and workflow runs. One and only one of these
# targets can be set to "default: true".
targets:
# The 'dev' target, used for development purposes.
# Whenever a developer deploys using 'dev', they get their own copy.
dev:
# We use 'mode: development' to make sure everything deployed to this target gets a prefix
# like '[dev my_user_name]'. Setting this mode also disables any schedules and
# automatic triggers for jobs and enables the 'development' mode for Delta Live Tables pipelines.
mode: development
default: true
workspace:
profile: asset-bundle-tutorial
root_path: /Users/${workspace.current_user.userName}/.bundle/${bundle.name}/my-envs/${bundle.target}
host: <path to your databricks dev workspace>
The databricks.yml bundle configuration file consists of sections called mappings. These mappings allow us to modularize the configuration file into separate logical blocks. There are 8 top-level mappings:
-
bundle
-
variables
-
workspace
-
artifacts
-
include
-
resources
-
sync
-
targets
Here, we use five of these mappings to organize our project.
bundle:
In the bundle mapping, we define the name of the bundle. Here, we can also define a default cluster ID that should be used for our development environments, as well as information about the Git URL and branch.
variables:
We can use the variables mapping to define custom variables and make our configuration file more reusable. For example, we declare a variable for the ID of an existing cluster and use it in different workflows. Now, in case you want to use a different cluster, all you have to do is to change the variable value.
resources:
The resources mapping is where we define our workflows. It includes zero or one of each of the following mappings: experiments, jobs, models, and pipelines. This is basically our deployment.yml file in the dbx project. Though there are some minor differences:
- For the
python_wheel_task, we must include the path to our wheel package; otherwise, Databricks can’t find the library. You can find more info about building wheel packages using DAB here. - We can use relative paths instead of full paths to run the notebook tasks. The path for the notebook to deploy is relative to the
databricks.ymlfile in which this task is declared.
targets:
The targets mapping is where we define the configurations and resources of different stages/environments of our projects. For example, for a typical CI/CD pipeline, we would have three targets: development, staging, and production. Each target can consist of all the top-level mappings (except targets) as child mappings. Here is the schema of the target mapping (databricks.yml).
targets:
  <some-unique-programmatic-identifier-for-this-target>:
    artifacts:
      ...
    bundle:
      ...
    compute_id: string
    default: true | false
    mode: development
    resources:
       ...
    sync:
       ...
    variables:
      <preceding-unique-variable-name>: <non-default-value>
    workspace:
      ...
The child mapping allows us to override the default configurations that we defined earlier in the top-level mappings. For example, if we want to have an isolated Databricks workspace for each stage of our CI/CD pipeline, we should set the workspace child mapping for each target.
workspace:
  profile: my-default-profile

targets:
  dev:
    default: true
  test:
    workspace:
      host: https://<staging-workspace-url>
  prod:
    workspace:
      host: https://<production-workspace-url>
include:
The include mapping allows us to break our configuration file into different modules. For example, we can save our resources and variables to the resources/dev_job.yml file and import it into our databricks.yml file.
# yaml-language-server: $schema=bundle_config_schema.json
bundle:
  name: DAB_tutorial #our bundle name

workspace:
  profile: asset-bundle-tutorial
include:
  - ./resources/*.yml

targets:
  # The 'dev' target, used for development purposes.
  # Whenever a developer deploys using 'dev', they get their own copy.
  dev:
    # We use 'mode: development' to make sure everything deployed to this target gets a prefix
    # like '[dev my_user_name]'. Setting this mode also disables any schedules and
    # automatic triggers for jobs and enables the 'development' mode for Delta Live Tables pipelines.
    mode: development
    default: true
For more detailed explanation of DAB configurations check out Databricks Asset Bundle configurations
Workflows
The workflows are exactly what I described in previous blog. The only differences is the location of artifacts and files.
The project skeleton
here is how the final project looks like
ASSET-BUNDLE-TUTORAL/
├─ my_package/
│  ├─ tasks/
│  │  ├─ __init__.py
│  │  ├─ sample_etl_job.py
│  ├─ __init__.py
│  ├─ common.py
├─ test/
│  ├─ conftest.py
│  ├─ test_sample.py
├─ notebooks/
│  ├─ explorative_analysis.py
│  ├─ run_unit_test.py
├─ resources/
│  ├─ dev_jobs.yml
├─ .gitignore
├─ .gitlab-ci.yml
├─ databricks.yml
├─ README.md
├─ setup.py
Validate, Deploy & Run
Now, open your terminal and run the following commands from the root directory:
-
validate: First, we should check if our configuration file has the right format and syntax. If the validation succeeds, you will get a JSON representation of the bundle configuration. In case of an error, fix it and run the command again until you receive the JSON file.
databricks bundle validate
-
deploy: Deployment includes building the Python wheel package and deploying it to our Databricks workspace, deploying the notebooks and other files to our Databricks workspace, and creating the jobs in our Databricks workflows.
databricks bundle deployIf no command options are specified, the Databricks CLI uses the default target as declared within the bundle configuration files. Here, we only have one target so it doesn’t matter, but to demonstrate this, we can also deploy a specific target by using the
-t devflag. -
run: Run the deployed jobs. Here, we can specify which job we want to run. For example, in the following command, we run the
test_jobjob in the dev target.databricks bundle run -t dev test_job
in the output you get a URL to that points to the job run in your workspace.

you can also find your jobs in he Workflow section of your Databricks workspace.
CI pipeline configuration
The general setup of our CI pipeline stays the same as the previous project. It consists of two main stages: test and deploy. In the test stage, the unit-test-job runs the unit tests and deploys a separate workflow for testing. The deploy stage, activated upon successful completion of the test stage, handles the deployment of your main ETL workflow.
Here, we have to add additional steps before each stage for installing Databricks CLI and setting up the authentication profile. We do this in the before_script section of our CI pipeline. The before_script keyword is used to define an array of commands that should run before each job’s script commands. More about it can be found here.
Optionally, you can use the after_project keyword to define an array of commands that should run AFTER each job. Here, we can use databricks bundle destroy --auto-approve to clean up after each job is over. In general, our pipeline go through these steps:
- Install the Databricks CLI and create configuration profile.
- Build the project.
- Push the build artifacts to the Databricks workspace.
- Install the wheel package on your cluster.
- Create the jobs on Databricks Workflows.
- Run the jobs.
here is how our .gitlab-ci.yml looks like:
image: python:3.9

stages:          # List of stages for jobs, and their order of execution
  - test
  - deploy

default:
  before_script:
    - echo "install databricks cli"
    - curl -V
    - curl -fsSL https://raw.githubusercontent.com/databricks/setup-cli/main/install.sh | sh
    - echo "databricks CLI installation finished"
    - echo "create the configuration profile for token authentication"
    - echo "[asset-bundle-tutorial]" > ~/.databrickscfg
    - echo "token = $DATABRICKS_TOKEN" >> ~/.databrickscfg
    - echo "host = $DATABRICKS_HOST" >> ~/.databrickscfg
    - echo "validate the bundle"
    - databricks bundle validate

  after_script:
    - echo "remove all workflows"
    #- databricks bundle destroy --auto-approve

unit-test-job:   # This job runs in the test stage.
  stage: test
  script:
    - echo "Running unit tests."
    - pip3 install --upgrade wheel setuptools
    - pip install -e ".[local]"
    - databricks bundle deploy -t dev
    - databricks bundle run -t dev test_job


deploy-job:      # This job runs in the deploy stage.
  stage: deploy  # It only runs when *both* jobs in the test stage complete successfully.
  script:
    - echo "Deploying application..."
    - echo "Install dependencies"
    - pip install -e ".[local]"
    - echo "Deploying Job"
    - databricks bundle deploy -t dev
    - databricks bundle run -t dev etl_job
Notes
Here are some notes that could help you set up your bundle project:
- In this blog, we created our bundle manually. In my experience, this helps to understand the underlying concepts and features better. But if you want to have a fast start with your project, you can use default and non-default bundle templates that are provided by Databricks or other parties. Check out this Databricks post to learn about how to initiate a project with the default Python template.
- When you deploy your code using
databricks bundle deploy, Databricks CLI runs the commandpython3 setup.py bdist_wheelto build your package using the setup.py file. If you already have python3 installed but your machine uses the python alias instead of python3, you will run into problems. However, this is easy to fix. For example, here and here are two Stack Overflow threads with some solutions.
What’s next
In the next blog post, I will start with my first blog post on how to start a machine learning project on Databricks. It will be the first post in my upcoming end-to-end machine learning pipeline, covering everything from development to production. Stay tuned!
Resouces
Make sure you update the cluster_id in resources/dev_jobs.yml
- Migrate from dbx to bundles | Databricks on AWS
- Databricks Asset Bundles development work tasks | Databricks on AWS
- Databricks Asset Bundle deployment modes | Databricks on AWS
- Develop a Python wheel by using Databricks Asset Bundles | Databricks on AWS
- Databricks Asset Bundles: A Standard, Unified Approach to Deploying Data Products on Databricks (youtube.com)
- repo and slides https://github.com/databricks/databricks-asset-bundles-dais2023